Method 1: Microsoft Office Outlook 2010
-
Video: How to connect Outlook to your personal email account
If you have problems using the Fix it, or if you want to use Outlook to set up your Internet email account instead, click one of these methods:
NOTE To complete these steps, you will need to know your email address and password provided by your Internet service provider (ISP).- Start Outlook.
- Click the File tab.
- In the Info category, click Account Settings, and then click Account Settings in the dropdown.
- On the Email tab, click New.
- Click to select the Email Account option, and then click Next.
- In the Add New Account dialog box, to configure the new email account automatically, configure the following settings in the Email Account section under Auto Account Setup:
- In the Your Name box, type your full name.
- In the Email Address box, type your e-mail address. 
Note: Your ISP provides this information. - In the Password box, type the password that your ISP provided.
- In the Retype Password box, retype the password, and then click Next to begin the Auto Account Setup process. 
Outlook will then try to automatically configure your account. Some ISPs require the full email address to be entered into theUser Name field. If you want Outlook to automatically enter your email password, make sure that the "Save this password in your password list check box is selected. If your account is successfully configured, the Add New Email Account dialog box indicates that the account is created successfully. - Click Finish, and then click Close to complete the account setup. 
Note If the automatic configuration fails, the Auto Account Setup feature tries to connect by using a connection that is not encrypted. If this method also fails, then the account must be configured manually.
To configure the Internet email account manually, follow these steps in the Add New Account dialog box:- Click the Manually configure server settings or additional server types check box, and then click Next.
- Click Internet Email, and then click Next.
- Under User Information , configure the following settings:
- In the Your Name box, type your full name.
- In the Email Address box, type your full email address. 
Note: Your ISP provides this information.
- Under Server Information, click the kind of email account that you have in the Account Type box. If you select POP3 or IMAP in theAccount Type box, configure the following settings:
- In the Incoming mail server box, type the name of the server in lowercase letters. The name may be in the form of "mail.contoso.com." Or, the name may be in the form of an IP address, such as 172.12.0.0.
- In the Outgoing mail server (SMTP) box, type the name of the outgoing email server in lowercase letters. The name may be in the form of "mail.contoso.com." Or, the name may be in the form of an IP address, such as 172.12.0.0. 
- Under Logon Information, configure the following settings:
- In the User Name box, type your user name. The user name is usually the part of your email address to the left of the @ symbol. Some ISPs require the full email address. Therefore, please contact your ISP if this is needed.
- In the Password box, type the password that your ISP provided.
- If you want Outlook to remember your email account password, click to select the Remember password check box. 
- If your ISP requires it, click to select the Require logon by using Secure Password Authentication (SPA) check box to log on by using Secure Password Authentication.
- Click Test Account Settings. When you click Test Account Settings, the following process occurs:
- The connectivity of the system to the Internet is confirmed.
- You are logged on to the SMTP server.
- You are logged on to the POP3 server.
- If the POP3 server must be logged on to first, Outlook automatically sets the Log on to incoming mail server before sending mail option.
- A test message is sent. This message explains any changes that Outlook made to the initial setup. 
- Click Next, and then click Finish.
-
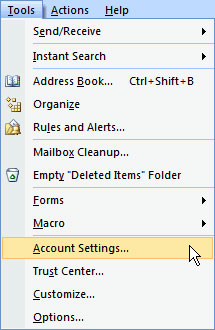
Open Outlook. Select Account Settings... from the Tools menu.
-
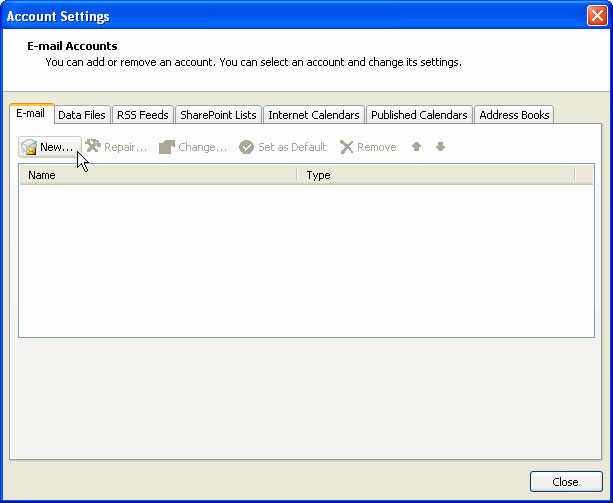
On the E-mail tab, click New.
-
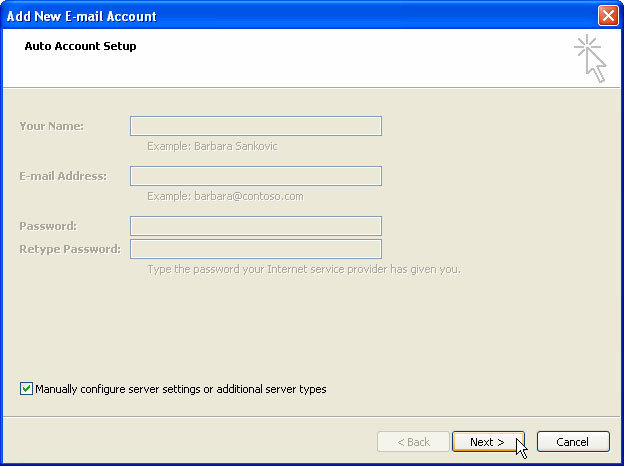
Select "Manually configure server settings or additional server types" and click Next >.
-
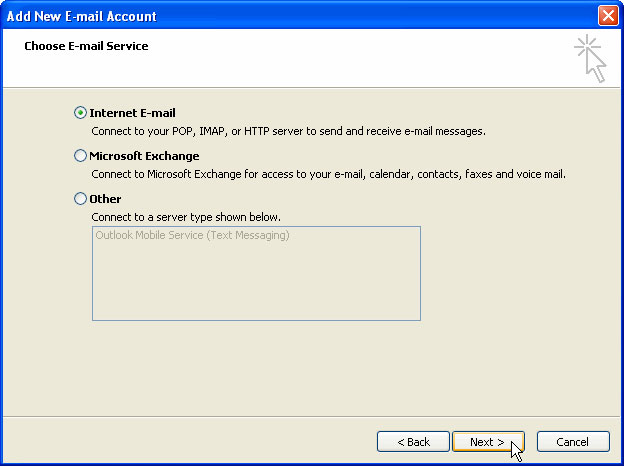
Select Internet E-mail and click Next >.
-
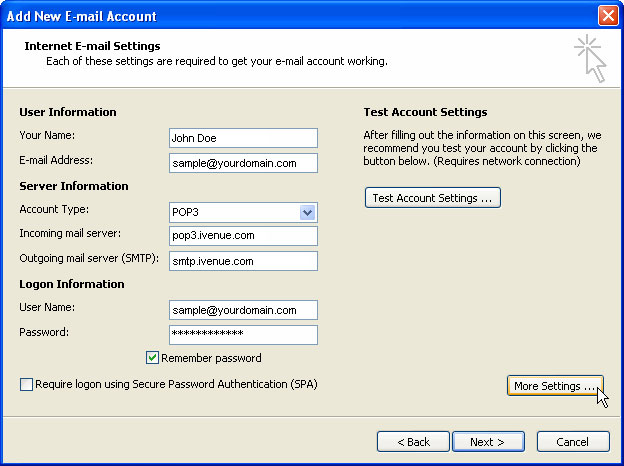
Enter the following information for E-mail Accounts.
- Your Name: Enter the name you wish recipients to see when they receive your message.
- Email Address:This is the address that your contacts' email program will reply to your messages. This is also the address that will get recorded in your contacts' address book if they add you as a contact.
- Account Type: POP3
- Incoming mail server: Enter pop3.ivenue.com
- Outgoing mail server (SMTP): Enter smtp.ivenue.com
- User Name: Enter your full e-mail address
- Password: If you wish for Outlook to save your password, check the box labeled Remember Password and enter your password in the text field.
- Click More Settings...
-
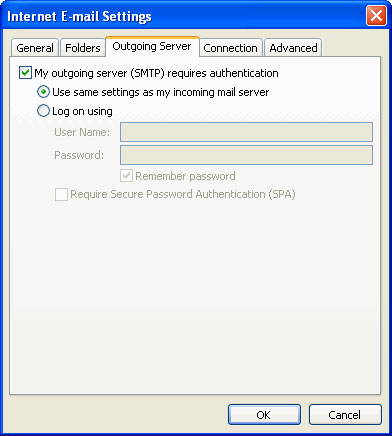
Click on the Outgoing Server tab, and check the box labeled My outgoing server (SMTP) requires authentication. Then choose to Use same settings as my incoming mail server
-
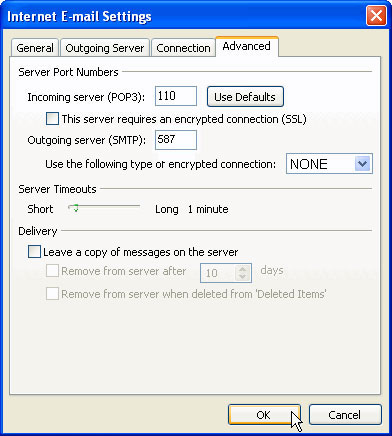
Click on the Advanced tab.
- Under Incoming Server (POP3), the port number should be set to 110.
- Under Outgoing Server (SMTP), the port number should be set to 587.
-
Click OK
-
Click Next. Click Finish.


